Service notice: Catalyst WebQ Survey and GradeBook have been retired effective June 16, 2022.
You can download survey content and responses, and gradebook files, from the Catalyst Archive. Learn more about the Catalyst Archive.
- Aging technology
- Availability of comparable or better survey tools
- Decreasing usage trends and changing use cases
- Why the tools must be retired
- Support from UW-IT for the transition from Catalyst GradeBook and WebQ
- What can I use instead?
- What if I need access to past survey content or gradebooks?
- Retirement milestones
- What happened to the other Catalyst tools?
The time has finally come to retire the last two remaining Catalyst web tools: WebQ Survey and GradeBook. As popular as these tools have been, they have aged beyond their useful life. The decision to retire Catalyst GradeBook and WebQ rests on the following realities.
Aging technology
Catalyst GradeBook and WebQ are built on an obsolete application framework, server environment, and front-end javascripts frameworks that are no longer supported and will not remain stable and secure. Over the past ten years, UW-IT has been unable to enhance GradeBook or WebQ, and, in fact, has had the capacity to address only the most severe defects. While the level of investment required to maintain these tools in their current state may seem low, the risks associated with continuing to operate the application are high:
- The operating system for the application servers supporting GradeBook and WebQ reached its end of life in 2020, and is no longer receiving security patches or updates.
- Underlying software libraries that support GradeBook and WebQ software can no longer be updated.
- Unsupported javascript libraries will increasingly be prone to breakage as browsers adopt the next generations of HTML, CSS and JS.
Continuing to provide GradeBook and WebQ is not tenable given the risk, availability of comparable tools, and declining usage.
Availability of comparable or better survey tools
When first released in 1998, WebQ was an innovative tool that provided considerable benefit to the university community by supporting teaching, learning, and research. Now, both Google and Microsoft offer comparable tools to build forms and surveys. In addition, many vendors provide full-featured research tools, and non-profit consortiums offer data collection systems, the features of which far surpass WebQ’s offerings. WebQ’s functionality is now redundant, superceded by better, modern Software-as-a-Service tools that meet researchers’ requirements.
GradeBook, first released in 2008, is entirely redundant to the gradebook in the Canvas LMS, which offers the additional benefit of integration with other Canvas features. Increasingly, the UW and our peers—not to mention the private sector—have embraced SaaS to provide higher-quality teaching, learning, research, and collaboration tools rather than devote resources to build these tools in-house. Most homegrown tools simply cannot keep up with the innovation, functionality, capability, security, and usability offered by SaaS. Moreover, these tools are in almost all cases much cheaper than homegrown solutions. Using these tools frees UW-IT staff to add value in other areas, rather than replicate tools from the marketplace. Finally, these are the tools that many students will use when they enter the workforce.
UW-IT’s governance boards have asked that services with decreasing usage and excellent enterprise replacement options be retired so that resources can be re-allocated to other existing or new services.
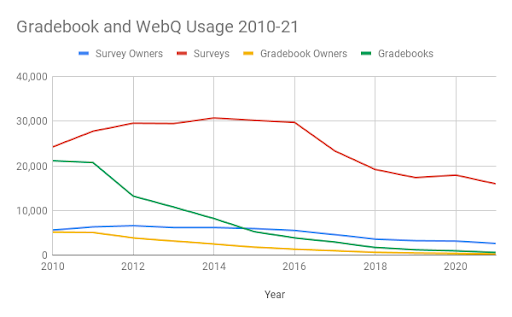
Decreasing usage trends and changing use cases
Usage of Catalyst GradeBook has fallen dramatically since the adoption of the Canvas learning management system in 2012, waning to only 225 users in 2021. UW-IT surveyed users about why they continue to use it, and prepared support materials to specifically address identified needs and support their transition to Canvas.
Even during remote operations of 2020-21, usage of WebQ has been declining. Usage of WebQ has been falling since it hit a peak in 2014, and the number of users creating surveys has fallen by more than half since then. In addition, analysis shows WebQ is no longer used primarily to conduct academic research, nor by students to learn research methods. Less than 3% of survey owners are students. The majority of surveys are created by staff (92%) to survey our own community (66% are UW NetID-secured). This use case is well supported by both Google Workspace and Microsoft Office 365.
Why the tools must retire
WebQ has already been operating with the absolute minimum of investment for nearly a decade. During that time, the team that minimally supports WebQ has added multiple new systems and services requiring more intensive support while at the same time facing and meeting increased demand to offer other teaching, learning, and collaboration technologies. UW-IT has not made lightly the decision to retire WebQ, the original and mostly widely used Catalyst web tool. Nor has this decision been made without exploring alternatives. The technology has reached a point where the only path forward involves considerable investment of engineering time. UW-IT has determined that this engineering effort, our most valuable resource, should be prioritized for those services that do not have available alternatives, such as the innovative Research Technologies for Teaching and Learning service, and student and instructor success analytics services.
Support from UW-IT for the transition from Catalyst GradeBook and WebQ
To help transition to other UW-IT supported tools, view the following documentation:
- About Canvas Gradebook
- Canvas Gradebook FAQ
- Catalyst GradeBook retirement FAQs
- Catalyst WebQ retirement FAQs
- Use Microsoft Forms to create a survey
- Use Google Forms to create a survey
What can I use instead?
Options for Catalyst WebQ Survey
The two UW-IT supported options are UW Google and UW Office 365. Both of these tools include a forms feature (Google Forms and Forms for Excel) that can be used to create and send surveys and gather responses. The table below shows the features available in each.
| Feature | UW Microsoft Forms | UW Google Forms |
| UW NetID secured | Yes (Only people in my organization can respond setting) | Yes (Restrict to users in UW and its trusted organizations setting) |
| Group secured | Forms can be restricted to members of a Microsoft- enabled group, as long as the group is not hidden. Note: Course groups are hidden for privacy reasons. | No |
| Anonymous | Yes | Yes (make sure that Collect email addresses setting is off) |
| Confidential | No, respondents cannot be identified by a code. | No, respondents cannot be identified by a code. |
Options for Catalyst GradeBook
Everything that you’ve been able to do in Catalyst GradeBook — track student scores online, securely share scores with students, calculate class grades, and submit final grades online — you can do in Canvas Gradebook.
What if I need access to past survey content or gradebooks?
The Catalyst Archive provides self-service download of your data from WebQ and GradeBook. Data is now available from the archive and will remain available self-service through July 31, 2024.
Retirement milestones
WebQ Survey
- January 19, 2022 First notice of retirement
- June 16, 2022 WebQ unavailable
- June 27, 2022 All data available via new download app
Catalyst GradeBook
- January 19, 2022 First notice of retirement
- June 16, 2022 GradeBook unavailable
- June 27, 2022 All data available via new download app
What happened to the other Catalyst Web Tools?
Collect It, CommonView, GoPost, QuickPoll, UMail, and WebQ Quiz were retired in 2017 for the same reasons that WebQ Survey and GradeBook are now being retired. The tools were built on a now outdated technology, usage of the tools was declining, and better solutions now exist. Learn more.
Please contact help@uw.edu if you have further questions.